|
|
|
|
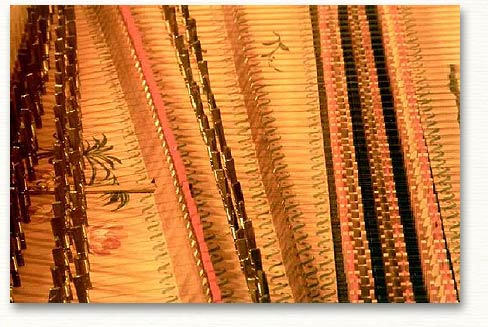
GENERAL ADMONISHMENTS FOR HARPSICHORD CARE. Harpsichords are made of wood. That sounds like a foolishly obvious thing to say, but it has dire ramifications. Wood expands and contracts with humidity and dryness, and if that movement is limited - that is to say, if the piece of wood is glued in place - any number of bad things can happen. When that piece of wood is under hundreds of pounds of string tension, chances are those things will happen. That's the radical approach to harpsichord maintenance. It lurks like a demon under any discussion of harpsichord ownership in North America. But without too much difficulty that demon can be kept in its place, rearing its head only in extremis. And in fact, the whole principle behind harpsichord maintenance is to avoid extremes. The most practical approach is to humidify in the winter if you live in a region where you heat in the winter, and to air-condition in the summer if you have days or weeks of 70% humidity or above. I build my instruments at a mean of 45% to 50% (unless specificially requested otherwise), and my instruments are happiest when kept there. Leave the instrument below 45% for any length of time, say a week, and the soundboard will split; for a longer period, the lid will crack and the bottom will shrink; a little longer and the action will become unplayable. An instrument left at, say, 35% for a month and a half will be in bad need of attention. Likewise, at humidities above 70% the soundboard will begin to warp; if left there for a summer the warp will set in permanently ("plastic deformation," they call it). By then, too, the action will have become obnoxiously sloppy. In areas where there are major season changes there's always a time lag in humidity: I needn't start humidifying here in Vermont until November, but I can't assume that a late-March thaw will make much difference indoors - the harpsichord is competing with the rugs and walls and furniture for any available moisture. But there's lots of good news for these problems. Even a classically-designed harpsichord such as the ones I make can have adjustments built in to bring the action and the case back into line when they have a difference and go their separate ways. I don't use bottom screws on the jacks: instead I mount the keyframes on screw adjustments through the case bottom to raise and lower the level of the keys. Lost motion has to be taken up in the summer, when the case expands vertically and the strings go up and the keyboards go down, and the jacks dangle by their dampers. In the winter, this has to be reversed. Incremental adjustments allow one to stay in step with these movements. Similarly, the registers have capstan screws in their ends for small adjustments side-to-side, to stay aligned with the strings. Within the extremes, these adjustments will easily keep an instrument playable, and as the years go on and the instrument sows its wild oats and settles down, they will need to be done less frequently. Further good news is that a crack in the soundboard doesn't much matter. Likewise a hairline split in the lid, or visible evidence of where the bottom is attached to the case. These things look a little odd, and too many of them will look bad, but they don't mean you no longer have a musical instrument. In the high humidity realm, a warped soundboard may eventually interfere with the strings, but a little warping is normal. Again, the byword is avoid extremes. Finally, an instrument can be built with some allowance for a specific climate. And if need be, an instrument that winds up in a radically different climate from its original home may be professionally regulated to suit, at least within limits. I try to make sure that an owner of one of my harpsichords is clear about the climate-control requirements and has at least a beginner's competence on regulating the action, changing a string, voicing a new plectrum. This involves hands-on lessons, and time should be scheduled for those at delivery. If at a later date extensive work needs to be done, I feel that it's a maker's responsibility - and his perogative - to attend to his own instruments. SPECIFICS FOR MY INSTRUMENTS. HUMIDITY. The optimum humidity for ease of regulation of the action is between 50% and 65%. Beyond those points, the action will need adjustment. Maximum extremes are 45% and 75%. At or beyond those points, damage will occur. KEYFRAME REGULATION. This is accomplished with two short threaded rods through the bottom at the rear of the keywell. An ordinary screwdriver is needed. As humidity goes up in the summer the case will expand vertically, and the keyframe will need to be raised. Screw in each of the threaded rods until the dampers clear the strings and are not dampening, then settle the keyframe back down until the dampers just touch. (The idea is to keep the jacks from hanging by their dampers). As the summer goes on this will need to be done in small increments two or three times, to take up lost motion between the keys and the jacks. The way to check if this is needed is either to feel the slight sloppiness of the lost motion as you play, or to visually check: with your eye on a jack, wiggle its key a bit and see if the jack wiggles. If it does not, contact between the key and the jack has to be restored. As the humidity goes down in the winter, this will be reversed. As dampers no longer touch the strings, the keyframe will need to be let back down, settling the dampers onto the strings. Humidifying will be necessary as the heating season goes on, and will keep these adjustments to a minimum. If the keyframe has been let all the way down to rest on the case bottom, and further adjustment is needed, raise the humidity: at this point, the humidity is too low. REGISTER REGULATION. Again, this is seasonal. There are capstan screws at the ends of the registers, readily visible in the French instruments with handstops. In the Flemish, with the registers through the cheek, these are only at the bass ends of the registers. Treble ends in the Flemish are adjusted with paper shims between the inside of the sheek and the small blocks atop the registers. The bass-end screws are under the screwed-down cleat which holds the registers with a little firmness. After you've made adjustments here, replace that cleat and check the down-pressure of its screws: the registers should move firmly but not tightly. In the French, this firming-up is accomplished by the handstop screws. The capstan screws regulate the "on" and "off" positions of the registers for the back 8' and the 4'. The front 8' has no "off" position: its capstan screws simply define its "on" position from both ends, so that it doesn't move. Find where you want the registers positioned by making small adjustments on the capstan screws (using a tiny screwdriver or an awl inserted into the holes). Keep in mind questions such as stagger between the ranks ("firing order" when more than one register is engaged: the order should be 4' - back 8' - front 8'), relative volume (the front 8' should be slightly quieter), clearance of the returning quills past their strings (if a register is "on" too far there will be more length of plectrum extending past the string than there will be backward clearance of the jack tongue, and the jack will hang by its quill with the tongue leaning back as far as it can go), and perhaps most importantly, evenness of plucking. These adjustments will be made in very small amounts as the seasons ebb and flow. KEYBOARD REMOVAL AND TRANSPOSITION. Unscrew the nameboard batten, using a relatively small screwdriver so as to not scratch the paint. Unscrew (with an ordinary-sized screwdriver) the two screws through the bottom in the front of the keywell, which hold the keyframe down. Remove the upper manual. Lift the lower manual jacks and stand them leaning on the lower guide (it helps to press down each key in turn to lift each jack more easily). Slide out the long transposing inserts on either side of the keyframe. (In a Flemish, I screw these blocks to the keyframes, upper and lower, and they cannot slide out separately). Slide out the lower manual. On a Flemish, unscrew the insert blocks and shift them around to the bass or treble (moving to 440 or 415, respectively. My Flemishes haven't had the 392 option). On a French, simply slide the keyframe back in, lifting and walking it over the keyframe regulation (height-adjustment) screws at the rear of the keywell, and then slide in the inserts to position the keyboard either towards the bass (392), the middle (415), or the treble (440). Reinstall the upper manual, the front keyframe screws, and then drop the jacks back into place. This shouldn't take more than ten or fifteen minutes after practise. NB: The tuning pins are patterned after the sharps and naturals on the French instruments: this pattern will correspond to the keys only in the 415 position. BROKEN STRINGS. Replacements may be had from me for $10.00 each, with hitchpin loops. Save the twist-ties from used spare strings, and when several are accumulated they may be mailed to me so I know what sizes to replace. The spare strings are supplied over-long: start wrappng a tuning pin about six inches from its hole in the bass, and about fifteen inches in the treble. A stringing schedule is supplied with each instrument. The number of each note (starting in the bass) is written on each jack. PLEASE keep in touch with me with any questions, problems, comments, or reports.
If you set up a harpsichord action as the antique actions were set up, you discover something that is not entirely comfortable to the hand. This is with a lightly-balanced key (3 grams), light jacks (not more than 5 gms each), birdquill, and an upwards angle to the mortise. The quill has stiffness, the angle gives resistance, and these are not masked by weight in the key or jack. The result is an exposed, definite pluck. A very comfortable action can be made with plastic plectra at a horizontal angle (we've been trained to this by plastic jacks) operating on a weighted jack or key. The difference is somewhat like the difference between a tracker action in an organ and an electro-pneumatic action, or between a hard clutch and automatic. I tend to prefer the more difficult action, for it tells the player more about the pluck itself. |
Robert
Hicks Harpsichords
314 Hall Road, Lincoln, Vermont. 05443
802
453 3996... rh@hicksharpsichords.com